Discovering mice in your home can be unsettling and potentially harmful to your health and property. These small, resilient creatures can multiply quickly, contaminate food, damage structures, and spread diseases through their droppings and urine. This comprehensive guide will help you identify a problem, how to get rid of mice, and prevent future infestations. In addition to addressing existing infestations, understanding how to remove mice from walls is crucial, as these areas often serve as hiding spots for the pests. By sealing entry points and setting appropriate traps, you can effectively manage any lingering issues and safeguard your living space. Regular inspections and maintenance will further enhance your defense against these unwanted invaders.
Quick Picks: How to Get Rid of Mice
Best Snap Trap
Weather Resistant

Preventative
Signs of Mouse Infestation

Identifying a mouse problem early is crucial for effective elimination. Mice are primarily nocturnal, so you might not see them during daylight hours even with a significant infestation. Here are the key signs to look for:
Droppings
Mouse droppings are rice-sized, dark brown pellets often found along walls, in drawers, cabinets, and food storage areas. Fresh droppings are shiny and dark, while older ones appear gray and crumbly.
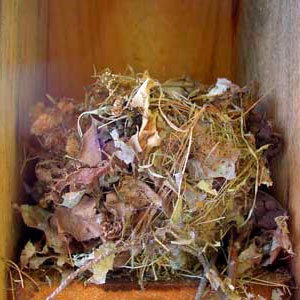
Nests
Mice build nests using shredded materials like paper, fabric, and insulation. Look for these in secluded areas such as attics, behind appliances, in cabinets, wall voids, and basements.
Noises
Scratching, scurrying, or squeaking sounds, especially at night, may indicate mice are active in your walls, ceiling, or floors.
Odor
A strong, musky ammonia-like smell often indicates a significant mouse presence. This odor comes from their urine and is particularly noticeable in enclosed spaces.
Additional signs include gnaw marks on food packaging, furniture, wires, or structural elements; grease marks along walls and baseboards where mice frequently travel; and tracks or tail marks in dusty areas.
If you see one mouse, there are almost certainly more. Mice reproduce rapidly, with females producing 5-10 litters per year, each with 5-6 young. A small problem can quickly become a severe infestation if not addressed promptly.
Comprehensive Mouse Control Strategy
Effective mouse control requires a systematic, multi-faceted approach. Random placement of a few traps rarely solves a mouse problem completely. The following five-step strategy provides a thorough framework for eliminating current infestations and preventing future problems. This strategy begins with proper assessment and identification of entry points, followed by sealing potential access areas. Additionally, employing the best mouse traps for home use is crucial in capturing and controlling the existing mouse population effectively. Finally, maintaining cleanliness and reducing food sources will help deter future infestations, ensuring long-term success.
Step 1: Assessment
Before taking action, it’s crucial to understand the scope of your mouse problem. This assessment helps you determine the appropriate control methods and resources needed.
| Assessment Factor | What to Look For | What It Tells You |
|---|---|---|
| Droppings | Fresh droppings are shiny and dark; old droppings are gray and crumbly | Fresh droppings indicate current activity; quantity suggests population size |
| Gnaw marks | Look at edges of holes, food packages, furniture, wires | Fresh wood shavings or plastic particles indicate recent activity |
| Sounds | Scratching, scurrying, squeaking (especially at night) | Provides location information about nesting or travel paths |
| Nests | Shredded paper, fabric, insulation in hidden areas | Indicates breeding activity; multiple nests suggest larger infestation |
| Pet behavior | Unusual attention to certain areas, pawing at walls or floors | Can reveal hidden mouse activity your assessment might miss |
- Map the infestation. Walk through your home with a flashlight and notebook, marking a floor plan with all signs of mouse activity:
- Droppings (quantity and freshness)
- Gnaw marks
- Nests or nesting materials
- Grease marks along walls
- Urine stains (visible under UV light)
- Food damage
- Determine the severity. Based on your findings, categorize your infestation:
- Mild: Occasional droppings in one area, no visible mice
- Moderate: Regular droppings in multiple areas, occasional mouse sightings
- Severe: Abundant fresh droppings throughout the home, multiple mouse sightings, visible damage
- Identify active pathways. Mice establish regular routes along walls and between food sources and nesting areas. Look for:
- Lines of droppings
- Grease marks along baseboards
- Disturbed dust showing tracks
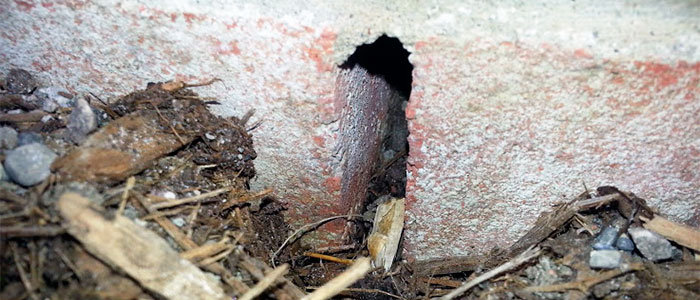
- Locate potential entry points. Thoroughly inspect your home’s exterior and interior for possible access points (holes ¼ inch or larger), focusing on:
- Foundation cracks
- Utility penetrations
- Door and window gaps
- Roof vents and eaves
- Attached garages
Sprinkle a thin layer of flour or baby powder along suspected mouse pathways in the evening. Check for tracks the next morning to confirm active travel routes, which helps with optimal trap placement.
Step 2: Elimination
With your assessment complete, it’s time to remove existing mice using methods appropriate to your situation. For most infestations, a combination of approaches yields the best results. Consider using traps that capture mice without harming them, as this aligns with how to remove mice humanely and allows for their release far away from your home. Additionally, sealing entry points and maintaining a clean environment can help prevent future infestations. Evaluating your situation regularly will also ensure that your chosen methods remain effective. You may also want to consider some of the best homemade mice remedies that can help deter them from returning. Things like peppermint oil, vinegar, and baking soda are not only effective but also safe to use around children and pets. By incorporating these natural solutions along with traps and sealing entry points, you can create a comprehensive strategy to keep your space mouse-free.
Mouse Control Methods: Selection Guide
Understanding the appropriate applications of different mouse control methods can help you choose the most effective solution for your specific situation.
| Control Method | Best Used When | Not Recommended When | Cost |
|---|---|---|---|
| Traditional Snap Traps |
|
|
$ |
| Covered Kill Traps |
|
|
$$ |
| Electronic Traps |
|
|
$$$ |
| Live Catch Traps |
|
|
$$ |
| Rodenticide Baits |
|
|
$$ |
| Ultrasonic Repellers |
|
|
$$ |
| Professional Extermination |
|
|
$$$$$ |
| Exclusion Materials |
|
|
$$ |
For most home infestations, a combined approach using traditional snap traps and exclusion materials offers the best value and effectiveness. This modest investment can prevent the need for costly professional treatments later.
Trapping Strategies
Traps remain the most reliable method for eliminating mice. They provide confirmation of success and allow for proper disposal of carcasses.
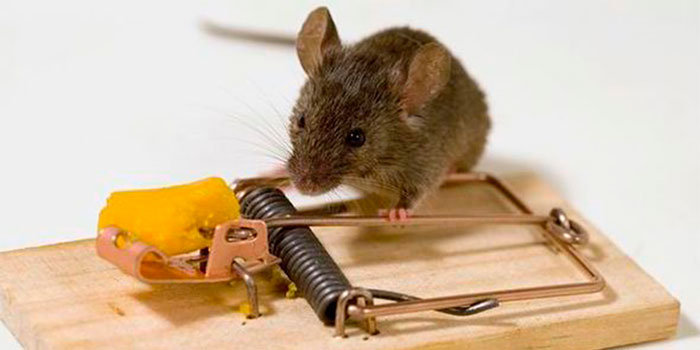
Snap Traps
Best for: Most situations, confirmed quick kills
Pros: Inexpensive, reusable, no poisons
Cons: Requires careful handling, visible dead mice
Covered Kill Traps
Best for: Homes with pets or children, squeamish users
Pros: No visible dead mice, safer around non-targets
Cons: More expensive, harder to set properly
Electric Traps
Best for: Humane killing, confirmation of catch
Pros: Quick death, no blood, contained disposal
Cons: Expensive, requires batteries
Live Catch Traps
Best for: No-kill preference, monitoring activity
Pros: Humane, no poisons, can catch multiple mice
Cons: Requires regular checking, needs release plan
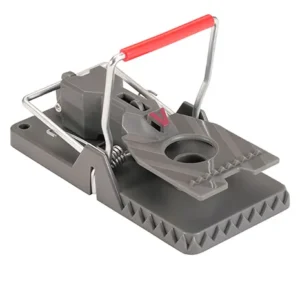
Victor M393SSR Humane Mouse Traps
Best TrapHow Does It Work
How to Use
- Set the trap with one simple click
- Bait with peanut butter or other high-protein food
- Place along walls where mouse activity has been observed
- After catching a mouse, simply click to release for disposal
- Clean with mild disinfectant and reset as needed
- Economical 6-pack for addressing larger infestations
- Easy one-click set and release mechanism
- No chemicals, safe to use around children and pets
- Reusable design for long-term rodent management
- Large trigger pedal for reliable activation
- Requires handling of dead mice
- May potentially harm pets if triggered accidentally
- Not enclosed, so caught mice are visible
- Needs regular checking and resetting
Master Trap Placement Strategy
- Quantity matters. For effective control, use:
- Mild infestation: 6-12 traps
- Moderate infestation: 12-24 traps
- Severe infestation: 24+ traps or professional help
- Position correctly. Place traps:
- Along walls with the trigger end facing the wall
- In pairs at right angles to walls forming a “T” with the triggers facing outward
- Every 2-3 feet along active runways
- Directly in pathways so mice can’t jump over them
- Near nests and entry points identified during assessment
- Strategic baiting. Select and apply baits appropriate for your situation:
- Most effective baits: Peanut butter, chocolate, bird seed, nuts
- Use only pea-sized amounts of bait
- Secure bait firmly to prevent theft
- Pre-bait traps for 2-3 days (bait without setting the trap) to reduce trap shyness
- Set multiple trap types. Mice vary in their response to different traps:
- Use different trap designs simultaneously
- Try different baits in different locations
- Set some traps along runways without bait (mice often jump over baited traps)
When using snap traps or covered kill traps, always handle with tools rather than your fingers to prevent injury. Keep all traps out of reach of children and pets.
Rodenticide Use
Poison baits can be effective in certain situations but should be used with caution due to potential risks.
Rodenticides pose serious risks to children, pets, and wildlife. Always use tamper-resistant bait stations and follow all label instructions. In homes with children or pets, consider trapping as a safer alternative.
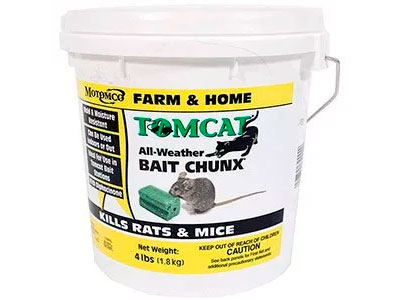
Tomcat All-Weather Bait Chunx
Weather ResistantHow Does It Work
How to Use
- Place chunx in tamper-resistant bait stations in areas with mouse activity.
- Position bait stations along walls where mice travel.
- For indoor use, place stations in corners, under appliances, and near entry points.
- For outdoor use, place stations along building foundations.
- Check stations regularly and replace bait as needed.
- Resistant to mold and moisture
- Highly palatable formulation attracts mice effectively
- Multiple feeding blocks in each package
- Can be used in various environmental conditions
- Requires multiple feedings to be lethal
- Contains poison requiring careful handling
- Must be kept away from children and pets
| Rodenticide Type | How It Works | Best Application | Considerations |
|---|---|---|---|
| First-generation anticoagulants (warfarin, chlorophacinone) | Prevents blood clotting after multiple feedings over several days | Large infestations, areas where trapping is impractical | Safer than second-generation options, but requires multiple feedings |
| Second-generation anticoagulants (bromadiolone, brodifacoum) | Single-feeding anticoagulants that are highly toxic | Severe infestations, resistant mouse populations | Higher secondary poisoning risk, greater environmental persistence |
| Acute toxicants (bromethalin, cholecalciferol) | Affects nervous system or calcium metabolism, death within 24-48 hours | When quick results are needed, anticoagulant-resistant populations | No antidote available for bromethalin, potential for secondary poisoning |
- Proper bait station use. Always place rodenticides in tamper-resistant bait stations:
- Use commercial stations or make DIY versions with PVC pipe
- Place stations along walls, near entry points, and in areas with activity
- Secure stations to prevent movement
- Check and refill regularly
- Strategic placement. Position bait stations:
- Every 8-12 feet in areas with high activity
- In dark, sheltered areas where mice feel secure
- Away from food preparation surfaces
- In areas inaccessible to children and pets
- Manage dead mice. Have a plan for locating and safely disposing of poisoned mice:
- Check the property daily for carcasses
- Wear gloves when handling dead mice
- Double-bag and dispose of according to local regulations
- Be prepared for potential odor issues from mice dying in inaccessible areas
Alternative Elimination Methods
Several other approaches can support your primary elimination strategy:
- Natural predators. Cats vary significantly in their hunting ability, but some are excellent mousers. Outdoor options include barn owls (installing nest boxes) and encouraging predatory birds.
- Electronic repellers. Ultrasonic devices emit high-frequency sounds unpleasant to mice. Effectiveness varies greatly and typically diminishes over time as mice habituate. Best used as a supplementary method in conjunction with traps or baits.
- Glue boards. These sticky traps capture mice that walk across them. Consider humane concerns, as mice aren’t killed instantly and may suffer. Always check glue boards frequently and be prepared to euthanize trapped mice humanely.
- CO₂ traps. These specialized devices use carbon dioxide to kill mice quickly. They’re expensive but effective and humane alternatives to traditional traps.
Keep a written log of your elimination efforts, including trap locations, catches, and bait consumption. This helps identify which methods are working and which areas need more attention.
Step 3: Exclusion
While elimination addresses your current mouse problem, exclusion prevents future infestations by sealing entry points. This step is arguably the most important for long-term control.

Copper mesh is ideal for sealing small gaps
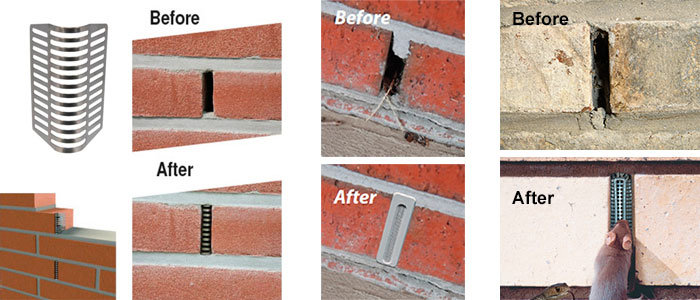
Metal flashing for larger openings
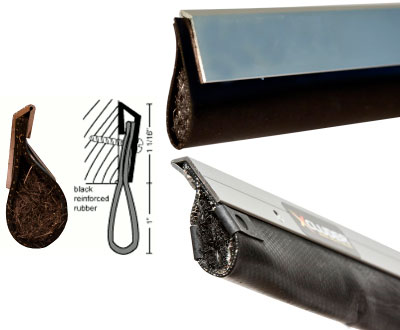
Door sweeps prevent entry under doors
Copper Mesh Pest Stopper
PreventativeHow Does It Work
How to Use
- Identify all potential entry points around your home, especially where pipes and wires enter.
- Cut the appropriate amount of copper mesh using scissors or wire cutters.
- Stuff the mesh tightly into gaps, cracks, and holes.
- For larger openings, use the mesh in combination with caulking or expanding foam.
- Ensure no mesh is sticking out where it could cause injury.
- Permanent solution that won't degrade over time
- Resistant to rust and corrosion
- Can be used both indoors and outdoors
- Flexible enough to fit irregular openings
- Non-toxic alternative to chemical methods
- Installation requires identifying all potential entry points
- May need additional materials for complete sealing
- Sharp edges require careful handling
Complete Home Sealing Process
- Exterior inspection. Systematically examine your home’s exterior, moving clockwise around the foundation:
- Use a flashlight to check the foundation for cracks
- Inspect where utility lines enter the building
- Check door and window frames for gaps
- Examine roof lines, vents, and chimney caps
- Look for damaged vent screens and loose siding
- Select the right materials. Different gaps require different sealing materials:
- For small holes (¼” to ½”): Copper or stainless steel wool, hardware cloth
- For medium gaps: Expanding foam designed for rodent exclusion (regular expanding foam isn’t rodent-proof)
- For large openings: Metal flashing, hardware cloth, cement
- For door gaps: Door sweeps, commercial rodent-proof door seals
- For pipe entries: Escutcheon plates, steel wool combined with caulk
- Systematic sealing. Address all potential entry points:
- Fill foundation cracks with mortar or concrete patch
- Seal utility penetrations with metal collars or steel wool
- Install door sweeps on all exterior doors
- Repair or replace damaged window screens
- Cap chimneys and secure all roof vents with hardware cloth
- Ensure dryer vents have functioning flaps that close when not in use
- Interior sealing. Address internal pathways mice use to move through your home:
- Seal gaps around pipes under sinks
- Cover gaps around plumbing with escutcheon plates
- Seal electrical outlet and switch plate gaps
- Fill holes where wires or pipes go between floors
- Close off unused ventilation ducts or openings
Before sealing holes permanently, stuff them temporarily with steel wool for 1-2 weeks. This allows any mice already inside to exit but prevents new ones from entering. Once activity ceases, apply permanent sealing materials.
Critical Areas Often Missed
Even careful homeowners frequently overlook these common entry points:
- Garage door gaps. Install commercial rodent-proof garage door seals along the bottom and sides.
- Roof line intersections. Seal gaps where different roof sections meet with metal flashing.
- Attic vents and soffits. Cover with 1/4-inch hardware cloth while maintaining proper ventilation.
- Foundation/siding intersections. Seal gaps where siding meets the foundation with appropriate caulk.
- AC line penetrations. Seal around air conditioner lines with rodent-proof materials.
- Crawl space vents. Cover with 1/4-inch hardware cloth to maintain ventilation while excluding mice.
- Wall gaps behind appliances. Seal openings around pipes and electrical lines.
Step 4: Sanitation
Proper sanitation serves two crucial purposes: eliminating attractants that draw mice to your home and cleaning up potentially hazardous mouse contamination.

Use storage containers to keep food sealed

Keep waste disposal areas neat and sealed
Remove all nests and clean areas
Eliminating Attractants
- Food storage. Protect all food sources:
- Store dry goods (cereal, pasta, pet food, bird seed) in airtight glass or metal containers
- Never leave pet food out overnight
- Address fruit/vegetable storage (keep refrigerated or in sealed containers)
- Regularly clean under and behind appliances where crumbs accumulate
- Use rodent-proof compost bins or keep compost piles well away from structures
- Waste management. Properly handle potential food sources:
- Use trash cans with tight-fitting lids
- Take garbage out regularly
- Clean recyclables before storage
- Maintain compost properly to avoid attracting rodents
- Clean up fallen fruit from trees promptly
- Water source elimination. Address moisture issues:
- Fix leaky pipes and faucets
- Don’t leave pet water bowls out overnight
- Address condensation issues
- Ensure proper drainage around the foundation
- Keep bird baths away from structures
- Nesting material removal. Eliminate potential bedding:
- Store fabric, paper, and cardboard in sealed plastic bins
- Remove piles of newspapers, magazines, and junk mail
- Keep storage areas organized and elevated
- Regularly inspect and clean potential nesting sites
- Remove unused or rarely used items from storage areas
Safe Cleanup of Mouse Contamination
Mouse droppings and urine can spread diseases like Hantavirus Pulmonary Syndrome, which can be fatal. Never sweep or vacuum droppings, as this can aerosolize virus particles. Always use the wet cleaning method described below.
- Preparation. Gather necessary supplies:
- Rubber, latex, or vinyl gloves
- N95 respirator mask or better
- Protective eyewear
- Disinfectant solution (1 part bleach to 10 parts water, prepared fresh)
- Paper towels
- Plastic garbage bags
- Ventilation. Before cleaning:
- Open windows and doors in the affected area
- Leave the area for 30 minutes to allow fresh air circulation
- Turn off forced-air heating/cooling systems to prevent spreading contaminants
- Wet cleaning method. Follow this process:
- Spray urine and droppings thoroughly with disinfectant until very wet
- Let soak for 5 minutes
- Use paper towels to pick up droppings and contaminated materials
- Clean the affected area with disinfectant
- Place all waste in a plastic bag and seal tightly
- Place the first bag inside a second bag and seal
- Dispose of in outdoor trash
- Comprehensive cleaning. Address all potentially contaminated areas:
- Disinfect countertops, cabinets, and food preparation surfaces
- Steam clean or shampoo upholstered furniture
- Wash bedding, towels, and clothing in hot water and detergent
- For carpeting, use a steam cleaner or professional carpet cleaning service
- Disinfect reusable containers before refilling with food
Step 5: Monitoring and Ongoing Prevention
Even after successful elimination, ongoing vigilance prevents future problems. Implement a regular monitoring system to catch new infestations early.

- Set up monitoring stations. Place these in high-risk areas:
- Use non-toxic bait blocks in tamper-resistant stations
- Install tracking powder patches in suspected entry areas
- Maintain a few strategically placed snap traps as sentinels
- Consider motion-activated cameras in problem areas
- Implement a regular inspection schedule. Mark your calendar for:
- Monthly checks of all entry points
- Quarterly inspection of attics, crawl spaces, and storage areas
- Seasonal examination of exterior foundation and roof lines
- Weekly monitoring station checks
- Maintain a prevention log. Document:
- Inspection dates and findings
- Any new mouse activity detected
- Maintenance performed on exclusion measures
- Seasonal factors that might increase mouse pressure
- Seasonal prevention adjustments. Adapt your approach throughout the year:
- Fall: Increase monitoring as mice seek winter shelter
- Winter: Check entry points after severe weather
- Spring: Monitor for breeding activity
- Summer: Focus on outdoor management and food source control
Place small pieces of white paper towel in suspected mouse areas. Check regularly for droppings, which are more visible against the white background, allowing you to catch new infestations before they become established.
Ongoing Prevention Tips
- Maintain a 2-foot vegetation-free zone around your foundation
- Store firewood at least 20 feet from your home and elevated off the ground
- Keep bird feeders at least 50 feet from structures or use no-waste seed mixes
- Regularly trim tree branches that overhang or touch your roof
- Inspect and repair exclusion measures after storms or seasonal changes
- Maintain a consistent cleaning schedule for your home, especially in food storage areas
- Consider professional preventive treatments annually in problem-prone areas
When to Call a Professional
While many mouse problems can be handled with DIY methods, consider professional pest control in these situations:
- Large or persistent infestations that don’t respond to your control efforts
- Infestations in complex structures with many potential entry points
- Homes with small children or pets where using traps or poisons creates safety concerns
- When mice are accessing hard-to-reach areas like wall voids or crawlspaces
- If you suspect a health risk due to extensive mouse droppings or urine
Professional exterminators have access to commercial-grade products and specialized equipment. They also have the training to identify and seal entry points that homeowners might miss.
Frequently Asked Questions
How do I know if I have mice or rats?
Mice are significantly smaller than rats, typically weighing less than 1 ounce with bodies 3-4 inches long. Mouse droppings are rod-shaped and about 1/4 inch long, while rat droppings are larger (3/4 inch) and capsule-shaped. Mice have larger ears relative to their head size and pointier snouts compared to rats.
How long does it take to get rid of mice?
For minor infestations (1-5 mice), control can often be achieved within 1-3 weeks. More significant infestations may take 1-3 months of consistent effort. Complete elimination requires not just removing existing mice but also sealing entry points and eliminating attractants to prevent re-infestation.
Can mice climb walls and stairs?
Yes, mice are excellent climbers. They can scale vertical walls, especially textured surfaces like wood, brick, or concrete. They can also climb up inside walls using the studs for support. Mice can easily navigate stairs and jump up to 12 inches high.
Are mice dangerous to humans?
Mice can pose health risks through the diseases they carry. They can transmit diseases like Hantavirus, Salmonellosis, and Lymphocytic Choriomeningitis through their droppings, urine, and saliva. They also trigger allergies and asthma in some people. Additionally, mice can cause property damage by chewing on wires (creating fire hazards), wood, and insulation.
What’s the difference between field mice and house mice?
House mice (Mus musculus) are usually grayish-brown, have a musky odor, and adapted to living closely with humans. Field mice (usually deer mice, Peromyscus spp.) typically have white bellies and feet with brownish backs, larger eyes and ears, and prefer outdoor habitats but will enter structures for shelter. Field mice are more likely to carry diseases like Hantavirus.
Will mice leave on their own?
Mice rarely leave a home voluntarily once they’ve established themselves, especially if food, water, and shelter are available. Seasonal changes might cause some fluctuation in mouse populations, but without active intervention, mice will typically remain and reproduce, potentially leading to larger infestations over time.
How many traps should I set for mice?
For effective control, use multiple traps—experts recommend at least 6 traps for a small infestation and 12+ for larger problems. Place traps 2-3 feet apart in areas with signs of mouse activity, focusing on their travel routes along walls and behind objects. Using too few traps is a common reason for control failure.
Final Thoughts
Mouse control is most effective when approached systematically, combining elimination methods with preventative measures. Remember that consistency is key—even a single missed entry point or food source can lead to re-infestation.
For most homeowners, a combination of trapping, exclusion, and habitat modification will successfully resolve mouse problems. However, don’t hesitate to consult professionals for persistent or severe infestations, especially if they pose health risks to your household.
By implementing the strategies outlined in this guide, you can create and maintain a mouse-free home environment that protects both your property and your family’s health.