Discovering mole tunnels and molehills in your carefully maintained lawn can be frustrating. While these underground creatures play a beneficial role in soil aeration, their tunneling can severely damage plant roots and create hazardous holes throughout your yard. This comprehensive guide shares proven DIY mole removal methods that are cost-effective, environmentally friendly, and can be implemented using common household items.
Quick Picks: Best DIY Mole Removal Methods

Most Effective
Humane Option

Simple Solution
How to Identify Mole Activity in Your Yard
Before attempting any removal method, it’s important to confirm you’re dealing with moles and understand their activity patterns. Moles are insectivores with large front paws specially designed for digging and tunneling underground. They primarily feed on earthworms, grubs, and other soil insects—not your plants (though their tunneling can damage roots).
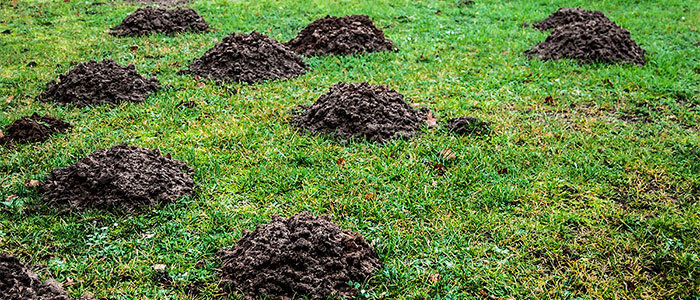
Look for these telltale signs of mole activity:
- Raised ridges or tunnels just below the surface of your lawn
- Cone-shaped mounds of loose soil (molehills)
- Areas where grass is dying due to root damage
- Fresh soil activity appearing overnight
To locate active tunnels (which is crucial for effective treatment), gently press down sections of raised ridges with your foot. Check these areas after 24-48 hours—if the ridges have been raised again, you’ve found an active tunnel that should be targeted for treatment.
7 Effective DIY Mole Removal Methods
1. Castor Oil and Dish Soap Mixture
You’ll Need:
- ¼ cup castor oil
- 2 tablespoons liquid dish soap
- 1 tablespoon cayenne pepper (optional for extra potency)
- 1 gallon of water
Directions:
- Combine the castor oil, dish soap, and cayenne pepper in a container
- Mix thoroughly until well blended
- Add this mixture to one gallon of water
- Pour directly into mole tunnels and around mole hills
- Spray the solution over affected areas of your lawn
- Reapply after heavy rainfall or every 2-3 weeks
Castor oil is one of the most effective natural mole repellents. The oil coats earthworms and other insects that moles feed on, making them taste unpleasant. Additionally, the oil creates an unpleasant environment in the soil that moles prefer to avoid. The dish soap helps the castor oil penetrate deeper into the soil.
Pro Tip: Make a larger batch of the concentrated mixture (without adding water) and store it for future use. When needed, simply add one part concentrate to eight parts water and apply to problem areas.
2. Hot Sauce Repellent
You’ll Need:
- 6 tablespoons hot sauce (Tabasco or similar)
- 6 tablespoons dish soap
- 1 gallon of water
Directions:
- Mix the hot sauce and dish soap with one gallon of water
- Pour directly into active mole tunnels and around entry points
- Apply the mixture to the soil surface in affected areas
- Reapply every few days until mole activity ceases
The capsaicin in hot sauce irritates moles’ sensitive noses, making your lawn an uncomfortable environment they’ll want to escape. This solution is particularly effective for small areas or individual mole tunnels.
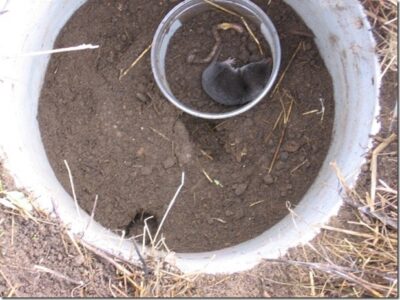
3. DIY Bucket Trap Method
Directions:
- Locate an active mole tunnel using the pressing method mentioned earlier
- Dig a hole directly in the path of the tunnel, deep enough to bury a bucket or large jar
- Place the container in the hole, ensuring its top is level with the tunnel
- Cave in the tunnels slightly on both sides of the bucket to encourage the mole to dig through
- Cover the setup with plywood or similar material to block light
- Check the trap regularly and relocate captured moles at least 5 miles from your property
This humane trapping method takes advantage of moles’ natural behavior. When encountering a collapsed tunnel, moles will instinctively try to clear the path, potentially falling into your container trap.
4. Flooding Method
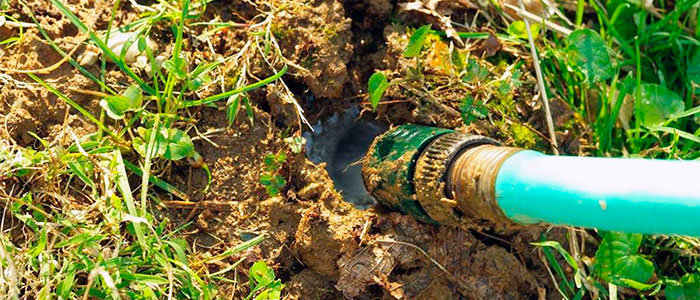
Using water to flush out moles is an immediate solution that can help you catch and relocate them:
- Insert a garden hose into an active tunnel entrance
- Run water slowly for 15-20 minutes
- Watch for moles emerging from exit holes as the tunnels fill with water
- Capture emerging moles with a bucket or container
- Relocate captured moles to a suitable habitat away from residential areas
When using the flooding method, be prepared to act quickly. Once moles surface, they can move surprisingly fast. Have a container ready and wear gloves to protect yourself when handling them.
5. Garlic and Pepper Repellent

Moles have a highly sensitive sense of smell and dislike strong odors like garlic and hot peppers:
- Crush several garlic cloves and mix with water
- Add 1-2 tablespoons of crushed red pepper flakes
- Let the mixture steep overnight
- Strain and pour into a spray bottle
- Apply directly into mole tunnels and around the perimeter of your garden
This natural repellent creates an unpleasant environment for moles without harming your plants or lawn. Reapply after rainfall for continued effectiveness.
6. Strategic Planting
Certain plants naturally repel moles due to their strong scents or toxic properties. Consider planting these throughout your yard as a long-term prevention strategy:
Daffodils
The bulbs contain lycorine, which is toxic to moles and other burrowing animals.
Marigolds
Their strong scent repels moles and other garden pests without being harmful.
Alliums
Ornamental onions whose odor naturally deters moles while attracting beneficial pollinators.
7. Barrier Installation
For valuable garden areas, installing a physical barrier can provide long-term protection:
- Dig a trench 24-30 inches deep around the perimeter of the area you want to protect
- Line the trench with hardware cloth or wire mesh (¼-inch grid works best)
- Extend the barrier about 6 inches above ground level to prevent moles from climbing over
- Backfill the trench and restore the lawn surface
While labor-intensive, this method creates a permanent solution for protecting specific areas like vegetable gardens or flower beds.
Understanding Moles vs. Voles: Know Your Pest
Important: Ground moles and voles (sometimes called “black moles”) differ significantly in appearance, habits, and the damage they cause. Correctly identifying which pest you’re dealing with is crucial for effective treatment.
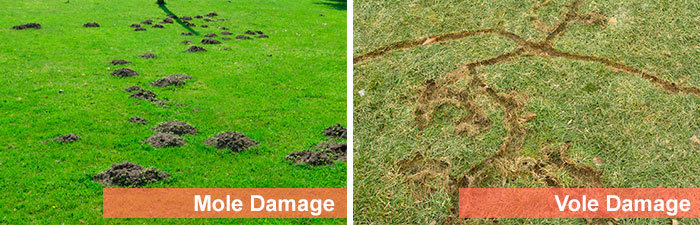
| Feature | Ground Moles | Voles (Black Moles) |
|---|---|---|
| Diet | Insectivores – eat earthworms, grubs, insects | Rodents – eat plant roots, bulbs, and bark |
| Appearance | Large front paws, pointed snout, nearly blind | Mouse-like with visible eyes and ears |
| Damage Pattern | Raised tunnels and cone-shaped mounds | Surface runways in grass and gnawed plants |
| Activity Season | Most active in spring and fall | Active year-round, especially winter |
Different control methods may be required depending on whether you’re dealing with moles or voles. The remedies in this article are most effective for true moles, but many will also work against voles.
Preventative Measures: Keep Moles Away Long-Term
Once you’ve successfully removed moles from your property, implement these strategies to prevent their return:
-
Reduce Soil Moisture
Limit irrigation to only what your lawn needs (about 1 inch of water per week). This creates less favorable conditions for earthworms and insects that attract moles.
-
Control Grub Populations
Apply milky spore or beneficial nematodes to naturally reduce Japanese beetle grubs and other lawn insects that serve as food sources for moles.
-
Regular Lawn Maintenance
Keep grass trimmed short and remove debris piles that could provide shelter. Well-maintained lawns are less appealing to moles and easier to monitor for new activity.
-
Perimeter Treatment
Apply your chosen repellent around the perimeter of your property every few weeks as a preventative measure, creating a barrier that discourages new moles from entering.
Frequently Asked Questions
How can I tell if my DIY mole repellent is working?
Monitor mole activity by flattening raised tunnels and checking for new activity after 24-48 hours. Effective repellents will result in no new tunnels or mounds appearing. You may notice gradual reduction in activity over 1-2 weeks as moles relocate.
How often should I apply homemade mole repellents?
Most homemade repellents should be reapplied every 2-3 weeks and after heavy rainfall. For severe infestations, you may need more frequent application initially (every 3-5 days) until activity significantly decreases.
Are DIY mole removal methods safe for pets and children?
Most natural repellents using castor oil, dish soap, and plant-based ingredients are safe around pets and children. However, keep pets away from areas treated with hot sauce or pepper-based repellents until dry. Always supervise children and pets around active traps.
What’s the fastest way to get rid of moles in my yard?
The flooding method combined with capture provides the most immediate results. For longer-term solutions, a combination of trapping and repellents typically yields the fastest comprehensive results. Persistence is key—complete elimination may take 2-3 weeks.
Will removing grubs from my lawn get rid of moles?
Reducing grub populations can help make your yard less attractive to moles, but may not eliminate them completely since moles primarily feed on earthworms. Grub control should be part of a comprehensive approach that includes repellents and other deterrents.
Conclusion: A Multi-Pronged Approach Works Best
When dealing with mole problems, combining several DIY removal methods often yields the best results. Start with repellents to make your yard inhospitable, set traps in active tunnels, and implement preventive measures to discourage new moles from moving in. Additionally, it’s crucial to monitor the areas where you’ve set traps and applied repellents, as this will help you determine which methods are working best. Consistency is key when learning how to eliminate moles effectively, so continue to adjust your approach based on the mole activity you observe. Remember, a combination of strategies will not only help remove existing moles but also prevent future infestations.
Remember that persistence is key. You may need to try several different approaches before finding the perfect solution for your specific situation. With consistent application of these DIY methods, you can reclaim your lawn and garden from these subterranean pests without resorting to harmful chemicals or expensive professional services.
While moles can be frustrating pests, they do provide some benefits to your soil through aeration and by consuming harmful insects. If their activity is minimal and not causing significant damage, consider tolerating their presence in less visible areas of your property.